Showing posts with label tips and techniques. Show all posts

Friday, August 03, 2012

you are my true cousin

this layout was published online last month over at scrapsteet.com. it was for their "technique turn" article which featured misting. i finished this layout using leftover stuff from studio azul's scrapbook laureat.  

nikko was 12 weeks old and aly was 5y.o when i took this photo. nikko looks way different now compared to this photo. it was aly who said that, that nikko was her "true cousin." she actually meant, first cousins. but she said it with such endearment that who can contest it!

a screenshot of the actual page from scrapstreet (with a little editing)

Tuesday, January 25, 2011

handmade flowers using tim holtz dies

yup, after a long time, i was able to finally create a little something.
i've seen handmade flowers used on layouts and mini albums over at youtube and i really wanted to do something like it.
since i have just cleaned my scraproom, it means i have space to start creating again. and these handmade flowers were first on my agenda.  first, i bought the tattered florals die by tim holtz, then searched youtube for video tutorials and then it was time to practice.
 i love what i was able to create!  

i followed the tutorial from these 3 ladies: marion (apieceofcraftdotcom); jennifer (craftbrulee) and tonya (psychomoms). i tried each version and liked best marion's and tonya's. i used my scraps for practice and i made a few pieces already. you can even embellish the flowers much like what i did with the first one i made. hopefully i can use these in my upcoming layouts and a create a few more. 

do try making one of these and be inspired to start creating for your scrapbooks.

Monday, February 15, 2010

rain or shine

a belated valentine's greetings to you all!  we had fun with our valentine day celebration yesterday, nothing fancy, just a stroll at the mall, lunch date and capped it off with dessert. 

speaking of valentine's day, our assignment at journaling junkie was to write a love letter to someone. the letter needs to be handwritten and we need to use non-traditional valentine colors.  no reds or sappy hearts.

hidden journal:
Love, remember this photo? It suddenly rained that night, New Year's Eve (2009).  But there we were out on the street.  It seems cheesy but it's so sweet! You were holding the umbrella making sure we don't get wet, and me holding to you tightly. That rain didn't stop us from neighbor-hoppig. It's been like that with the two of us for the past 5 years. Never mind the rain or setbacks. We just hold on to each other, we go with the flow and make the most of the situation. And it is no surprise that we see a ray of light, a glimmer of sunshine that makes us smile, laugh and enjoy every minute of being together. I'm sure we will continue to be like this for a long time. Rain or shine, it will be you and me always!

tips:  to create a semblance of raindrops, i scattered bling around the titles to give it that dewy feel.


materials used:
cardstock - dcwv; patterned paper - wrmk; alpha - american crafts, doodlebug designs; metal clip - making memories; ink - colorbox; fiber; dmc floss; bling

Monday, June 29, 2009

papa knows best

this is my layout for challenge 59 (father's day) at journaling junkie.

note: this was just picked as lotd (6-29-09) over at create my keepsake. yipee!

i created a layout about my father-in-law and included all of his kids' photos as well. i asked nelo to write the journal and i just edited it, the title also came from him.

notice the papers i used. that's from the vagabond collection of basic grey. again, had it for years already and was only able to create 1 layout from it back in 2006. practically the only new item here are the fabric alphas and that extra pattern from crate paper..

here's a tip:
- try customizing your own frame for your photos
- i created the photo frame for my fil's photo by using my fiskars apron lace border punch
- i then inked the edges with black paint and then heat embossed with utee for 3x
- it created a jelly-like texture which added a different effect to the photo

Journaling:
Blessed, that is how I feel to have you as our father. We are lucky to have been guided and inspired by you. You have been a very good teacher and have taught us most of what we know about raising our own family. As you always say, we should live life to the fullest. We are living it the way you would have wanted us to do it. And still, we know that you are thinking of us ahead of your own self. Supportive and selfless, nurturing and protective, that is who you are, because father knows best.

materials used: cardstock - bazzill; patterned paper - basic grey, crate paper; chipbaord - tim holtz, american crafts, heidi swapp; rub-ons - creative imaginations; felt - american crafts; bards - provo craft; acrylic paint - adirondack; utee; ink - versamark, chalkbox; border punch - fiskars

photography by jeff lopez

Thursday, April 23, 2009

best friends

i've been best friends with clariz since we were in college. we've been through a lot of ups and downs in our life and i consider her the sister i never had. priorities change in life still, our friendship remains.

journal:
time really flies fast in our friendship. it's almost two decades since we first met and we never realized that we'll be best friends from then on. we've shared a lot of things together. good and bad, we're there to support each other. married life has somehow changed our priorities but we never forgot, we never let go of our special bond. we'll still be best friends always! (july 2008)

tips & techniques:

this bird image i stamped was not directly stamped on the layout.
- try stamping your image on paper vellum and cut closely to the image
- after stamping, place a diamond glaze on top, let dry
- this will give your image an embossed effect minus the use of embossing powder/heat gun
by the way, i ran out of the letter "s" and i substituted it instead with the letter "z." it's also a good way of maximizing your supplies and making it work for you. another example here is using "3" for letter "e."

materials used (available at a walk down memory lane):
cardstock - dcwv; patterned paper - piggy tales, tinkering ink; rub-ons - autumn leaves, fancy pants; stamps - inkadinkadoo, autumn leaves; alpha - american crafts; ink - chalkbox, brilliance; dimensional glaze; pen - copic marker, american crafts

and by the way, marix is celebrating her 3rd blogoversary via a blog candy. she'll be giving away a collection of patterned papers, a mini stamp and some cardstock. do check out her blog and join in her celebration.

Monday, March 30, 2009

distressed edge technique

I’ve always loved the distress look on my scrapbook layouts. It gives the paper the extra texture and a bit of dimension. It can also create a vintage look for your design if you place ink or stains over it.

Sometimes though, just using a paper distresser or a sanding block just isn’t enough for the distressed edge that I want. I tried running it under a faucet of water and discovered that I like the effect.

I’d like to share this simple technique with you. Try it out and see the effect it can do for your layouts.

Materials:
- Patterned Paper - I suggest using Making Memories papers. They are the Featured Manufacturer for the month at AWDML. All Making Memories products are 15% off through March 31.
- Paper Distresser
- Foam Brush
- Small amount of water

Steps:
- Using a paper distresser, distress the edges of your patterned paper. Just distress enough to have a frayed edge. - After distressing, get a foam brush and dip in water.
- Brush the wet foam over the distressed edges. This will soften up the edges, which will help you further distress it using your fingers.
- Note: Wet a sizeable area of your patterned paper so it doesn’t dry up as you go along distressing it.

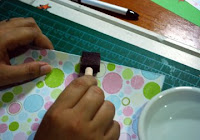
- While the edges are wet, curl it using your fingers (as shown in the visual). Curl it to further give it that distressed look. You may do curl it as much as you want based on your preference.


- As an option, you can also run the paper distresser through the edges while it’s still wet.
- After achieving your desired distress look for the paper edges, let it dry. Note that the paper may curl a bit as it dries up.
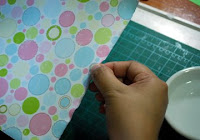
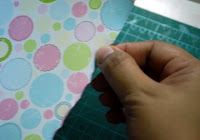
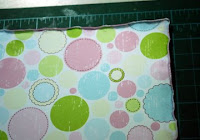
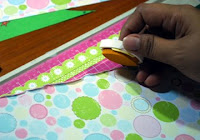


There you have it! Now you can do what you want on your distressed paper. I inked the edges to highlight it and to create a contrast for my layout. Check out the final layout below. Do try this technique and enjoy the results.

materials used: patterned paper, chipboard - making memories; alpha - american crafts; ink - colorbox; others - glitter glue, bling